
There is a lot of confusing things in Labyrinth of Refrain: Coven of Dusk. Players need to figure a lot of things out through dumb luck, trial and error or just thinking outside the box. Among the easiest and hardest is getting the true end. Nothing about the true end is hidden, per se, but the details, conditions and requirements can be tricky. Thankfully, this guide will help make it a lot simpler.
Requirements
To get the true end you need to receive the six black pages, which make up trophy/achievement Page 51 through Page 56, beat the last boss, transverse an additional dungeon and defeat one more monster. High note, unlocking the true end is the same as platinuming Labyrinth of Refrain: Coven of Dusk, though it’s a lot harder and longer than it sounds.
For this I strongly suggest having a party in the 70s, with multiple leveled decked out characters (leveled and strong equipment), and a diverse range of classes. This isn’t terribly important for the first couple of bosses but it will become a bigger hurdle as time progresses. That being said, I can confirm it’s possible to beat the absolute last boss without messing with Soul Transfer, it will just rely on luck and/or tactics.

Build
As for build, unless specifically mentioned otherwise, I suggest having a diverse range of characters, finding a formation that matches your team and keeping an eye out for good pacts. For post-game I found Dusk/White Rose to be a good general pact and Mira to be a fantastic support pact. For the last one you can do whatever, so I just picked a good back up support one with a couple slots.
The idea behind this build is to use Mira members as dedicated support characters, so give them things like the Old Great Fairy Scalp, with everyone else attacking. You should cycle through the skills, keeping a close eye on what the enemy does. So, if they do physical attacks, don’t use magic wards and vice versa. I also suggest keeping an eye on speed, as, if you can’t fortify or buff before taking damage, you might as well attack. For harder bosses you want to slip a level one character into the first support slot and use Iron Hide II to decrease incoming damage. From there it’s all luck and reacting to what your enemy does.
Unlocking the Pages
As previously mentioned, you need six black pages to unlock the final dungeon. Everyone is hidden behind an extremely powerful boss, with every dungeon getting an optional boss. While this guide goes in order of the dungeons, I suggest saving The Astrom Kingdom and Three Towers of Umbra for last. It’s also helpful to do Cobalt Campanula first, though not required.
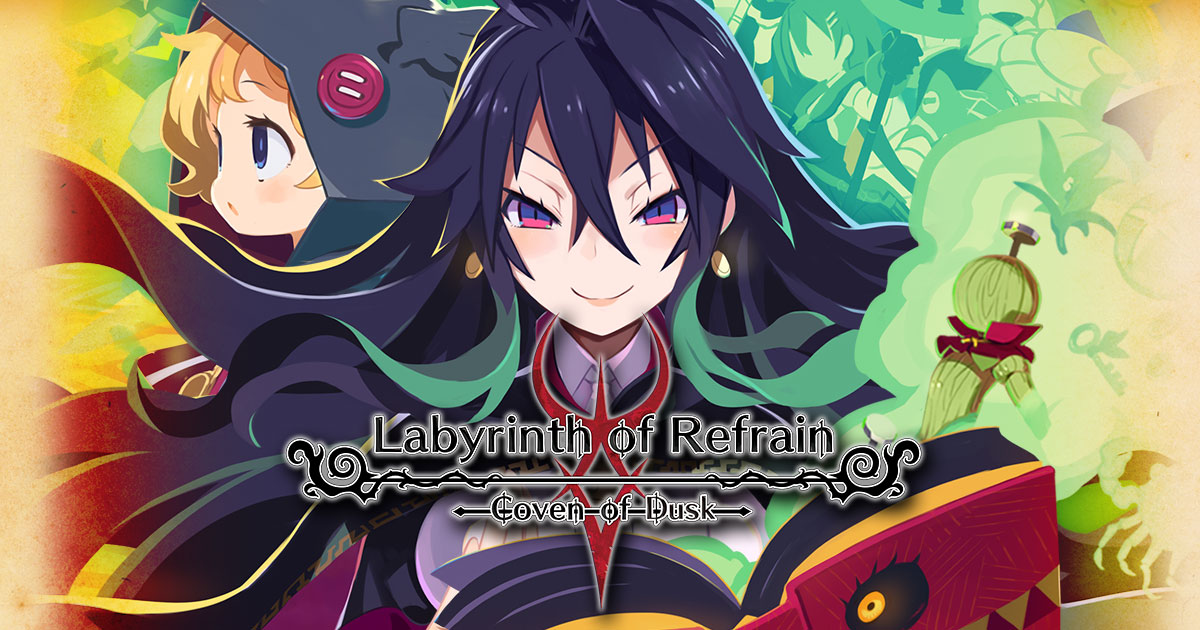
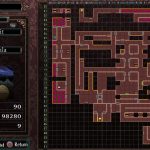
Cobalt Campanula – Subterra – B6
First and foremost, to get to Subterra – B6 you need to head down the alternate path, which is located to the left of where the dungeon starts. If this is confusing, check out The Astrom Kingdom guide for an image showing the location. After that you need to make your way down to the sixth floor and make your way to the red exclamation point. Since this can be rather annoying, a map is located below.
It might take a couple visits to get to the end, so just take it slow and try to use mud exits to save progress. Even though it’s a pain to get to, this is one of the easier bosses. There isn’t a complicated mechanic or additional element, so fight normally and hope for the best.
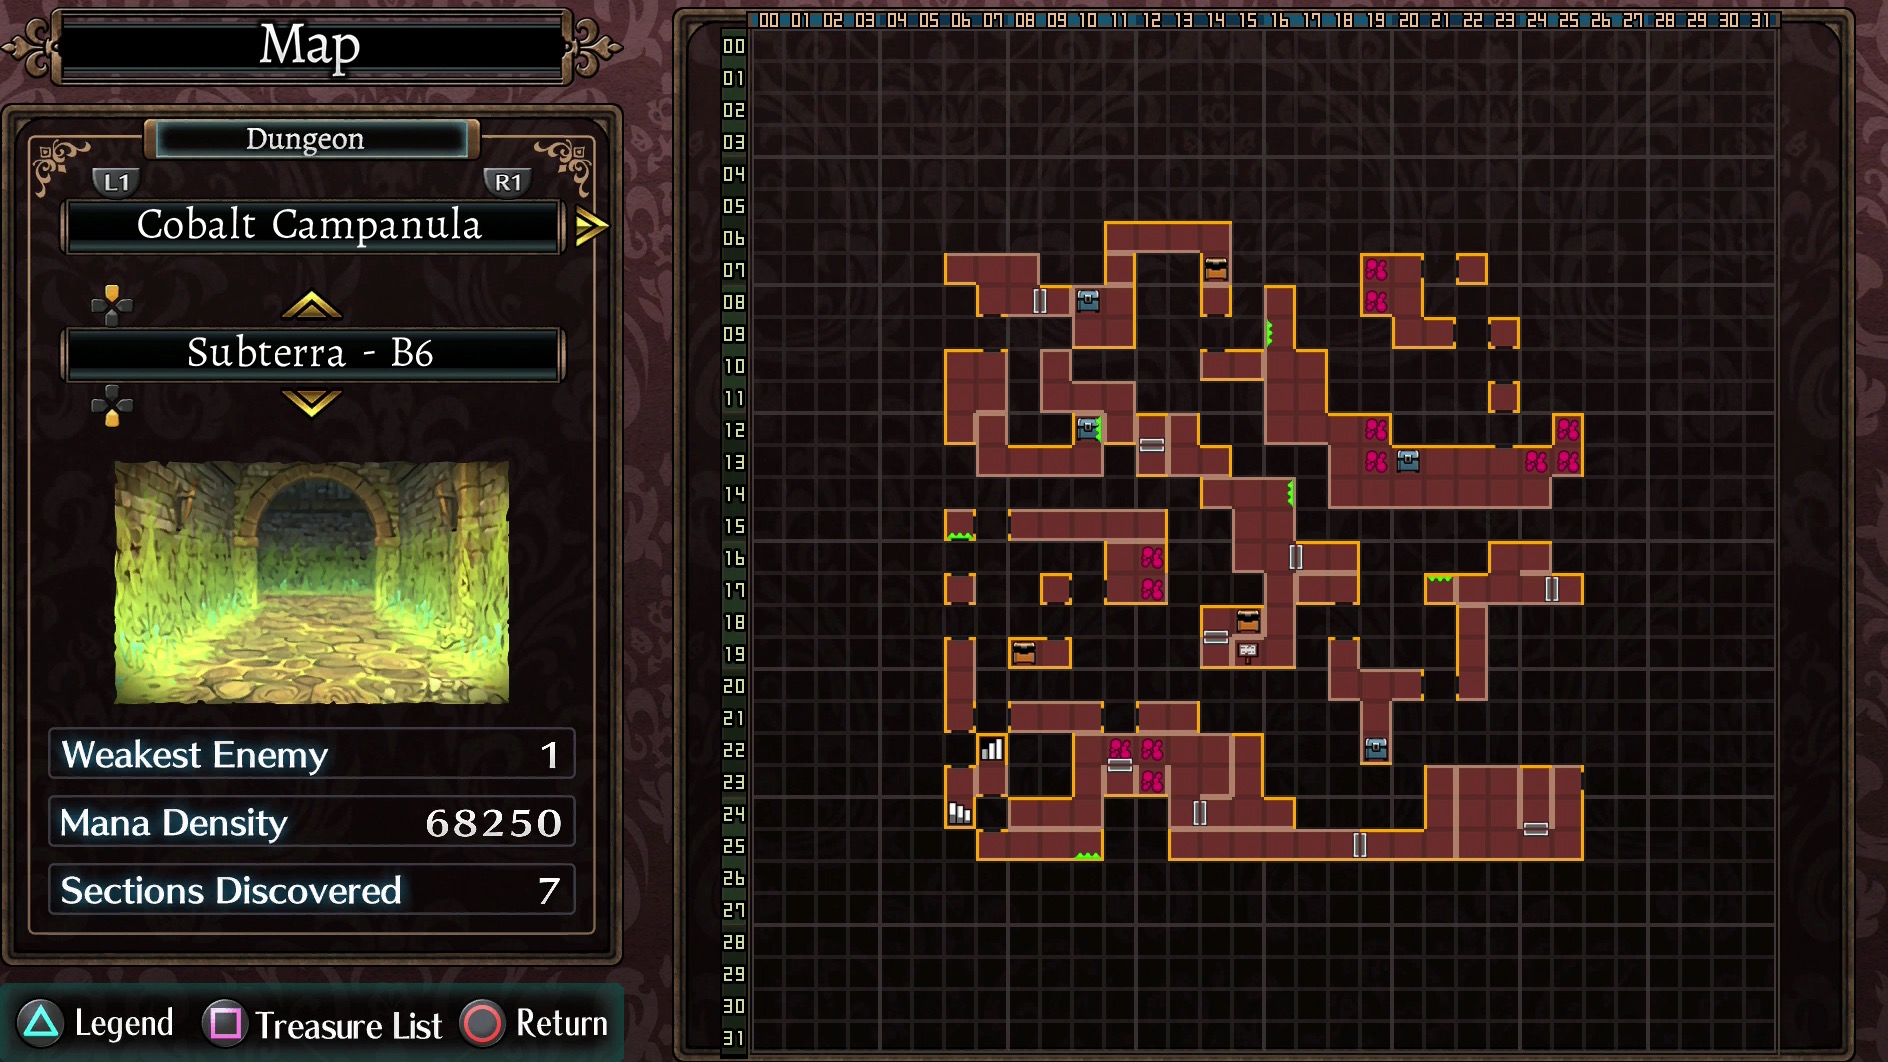
After beating the boss, you might want to head down to B7. The left path has an optional boss you need to defeat for the Melm, The Buried Empire page and the chest behind him has a fantastic pact for the last boss (not the true end one). I included the map above to make it easier.
The Astrom Kingdom – N. District
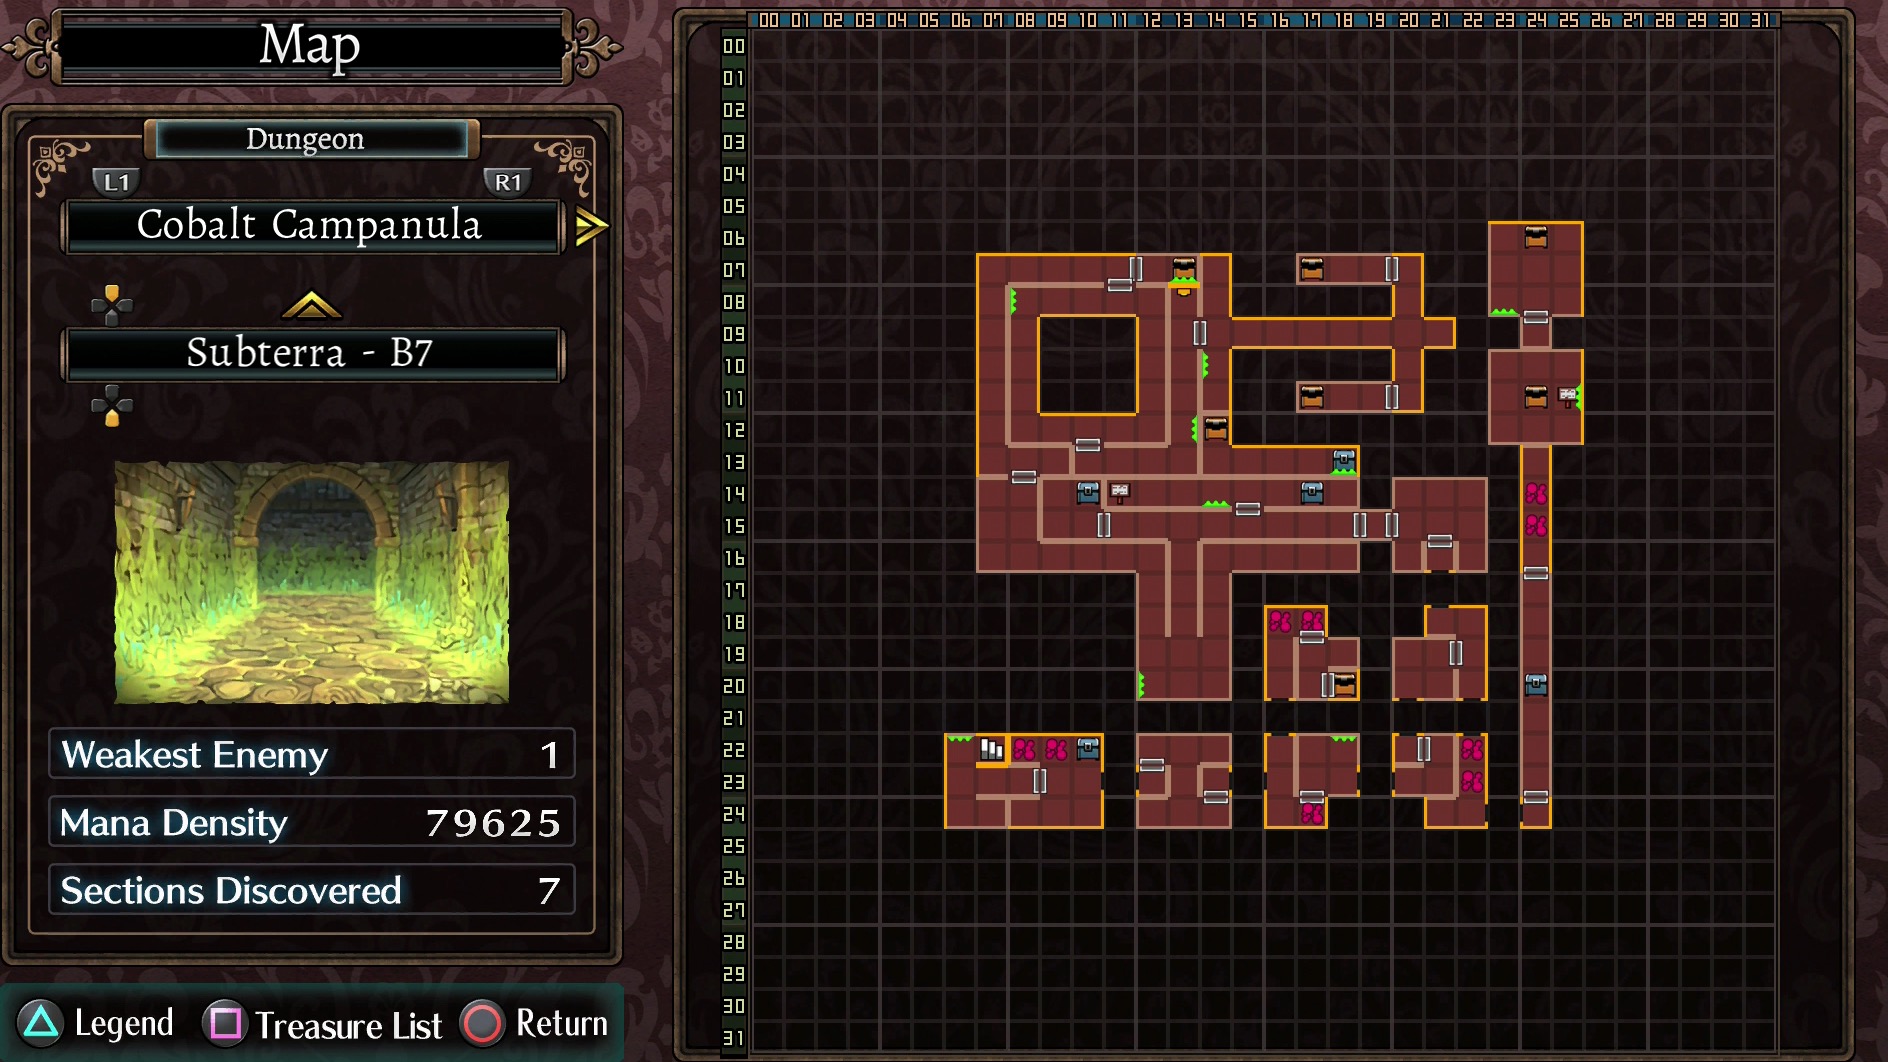
Unlike every other boss, this one only appears if you have The Art of Globe Repair in your possession. This is obtained by completing the Skilled Clockworker apprentice note. To unlock the note, you need to do, as near as I can tell, every other note. To complete the actual request, you need to find an Old Pocketwatch. While you should get one through normal progression, one can be found in the Subterra – B1 treasure chest found at X24, Y14 (requires Furia key) or as a treasure reward on the same floor.
Once you have it you can turn in the item, get the book and a new event will appear in the Astrom Kingdom. Clicking on it will summon the boss, which isn’t terribly complicated, but will require some decent tactics to defeat.
Melm, The Buried Empire – Divine Mausoleum
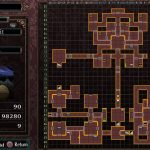
Okay, so, to find the Divine Mausoleum you need to head to Temple of Wings and fall down a hole. This is located at X26, Y14, which can be seen in the image below.
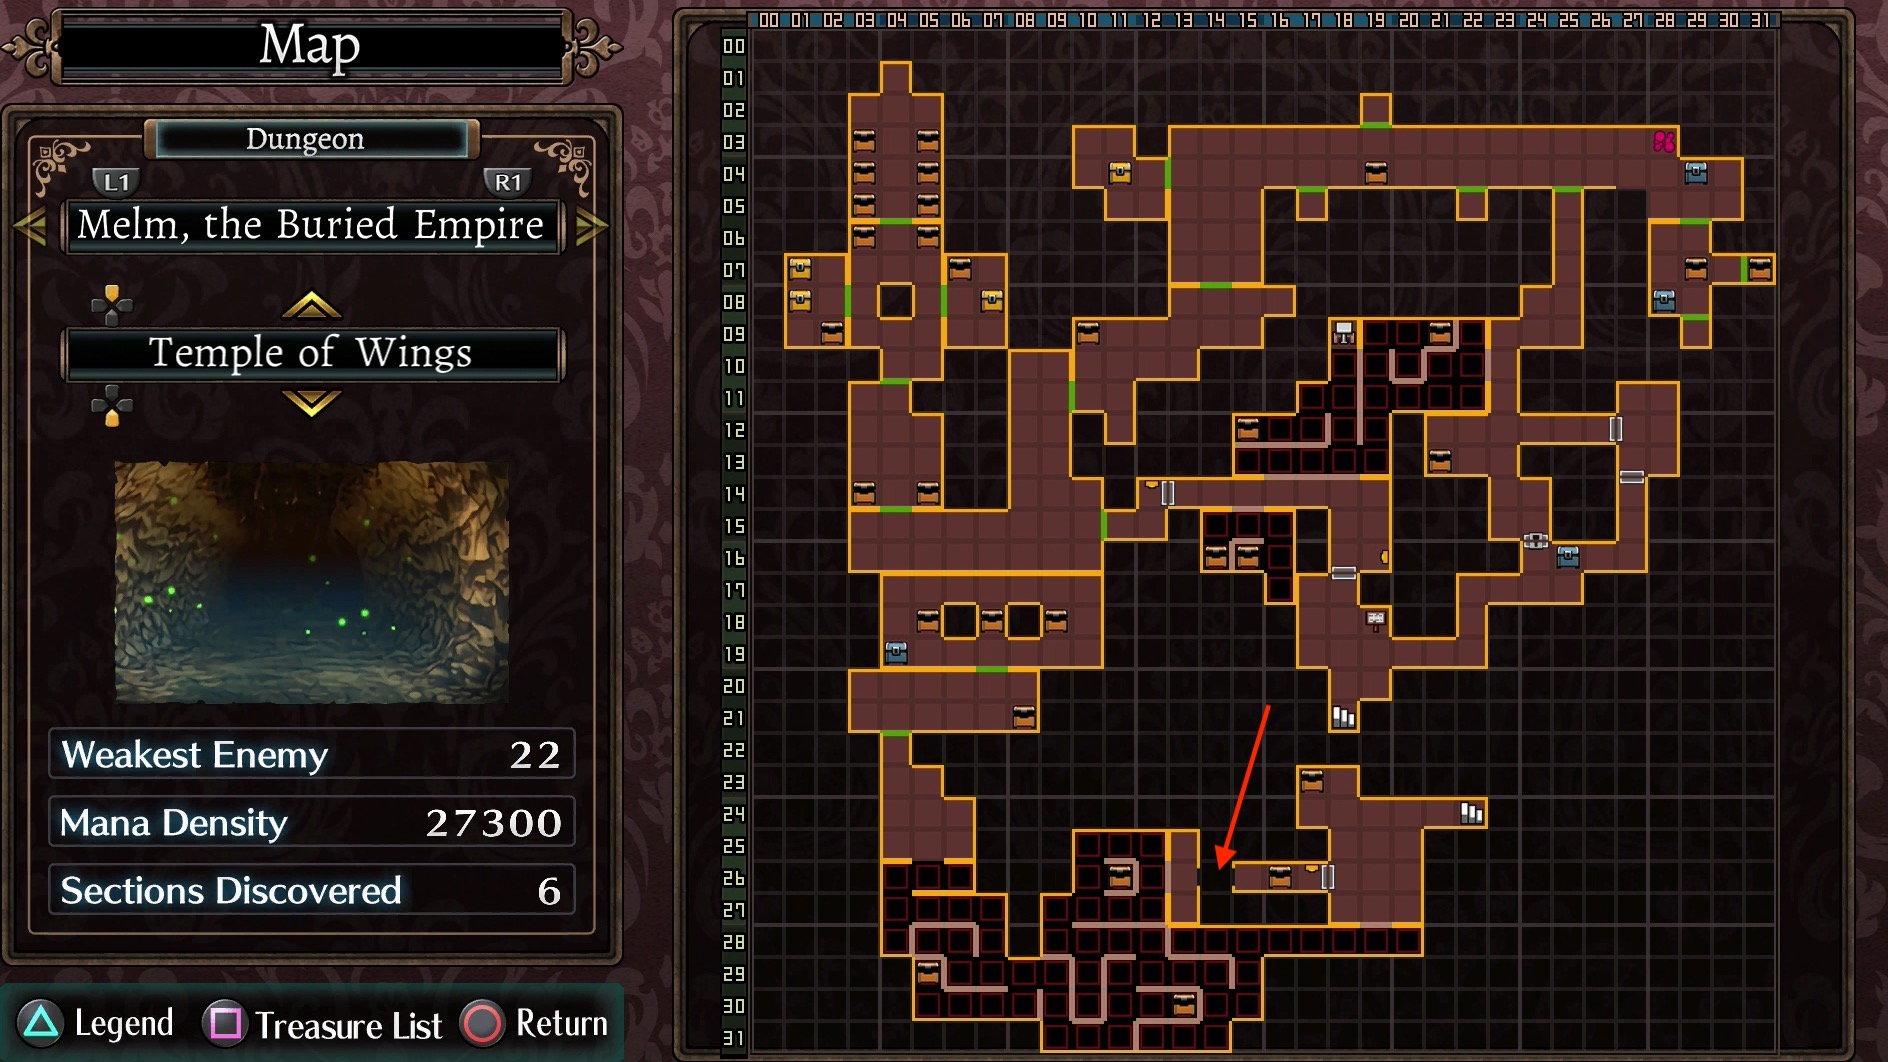
As for the Divine Mausoleum, you need to run around the dark, find door unlocks and warp around until you finally make it to the boss. This can be extremely annoying, so you can cheat and use the map below.
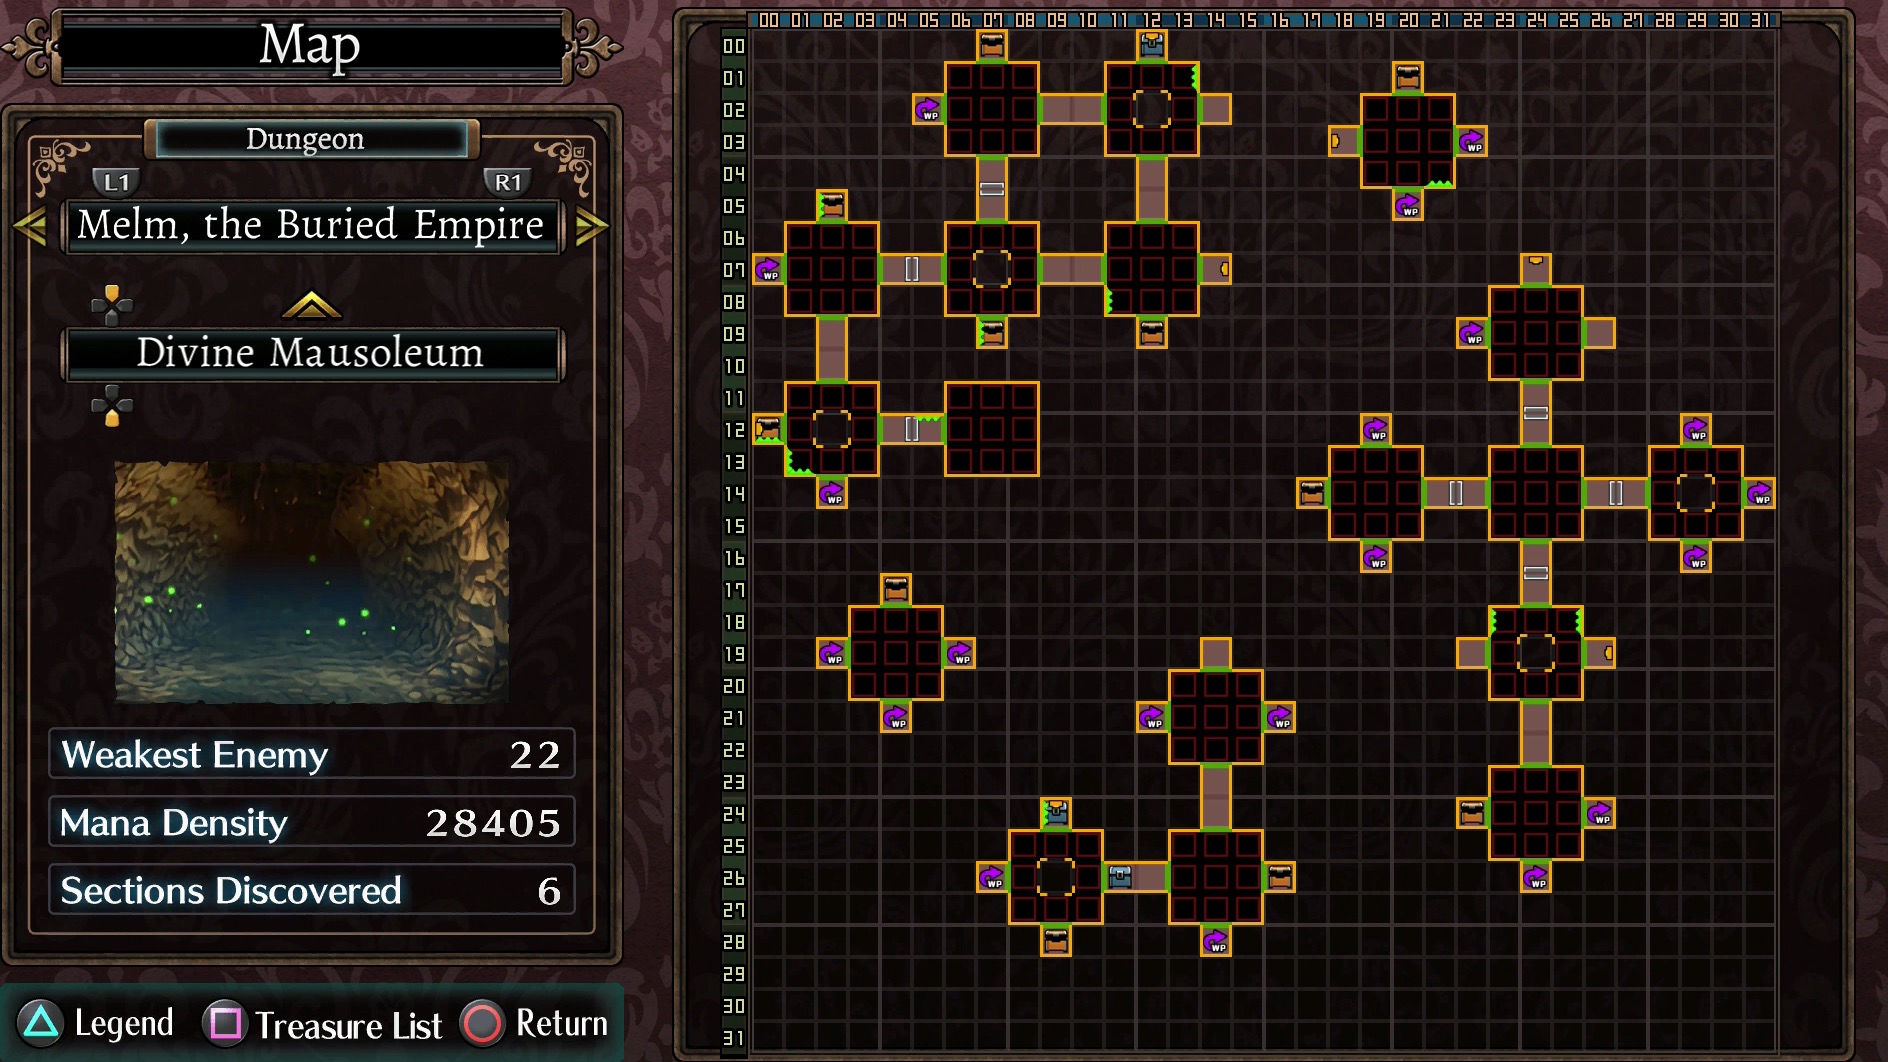
Now, before you fight the boss, make absolutely sure you have Bah-Bah’s Pact and it’s in your formation. If you don’t have it, simply return to Cobalt Campanula, head down to B7 and defeat the boss down the left path. If you can’t find it, a map of the area is located under the Cobalt Campanula section.
Anyway, Bah-Bah’s Pact has a unique Donum called Divine Exposure. This skill, which only needs to be used one, actually lets you damage Empress Junon. Without it you will lose, so don’t even bother without. As for the fight itself, outside of killing her machine first, her gimmick is the only thing to worry about.
Verdant Phenom – Fallrealm/Gem
Unlike most of the others, you should come across this one through story progression. If not, simply head to the top of Fallrealm/Gem and defeat the giant flower. Be careful of its bite and remember it’s weak to fire.
Three Towers of Umbra – Umbra – Top
Unless you kept things simple, returning to Overlord Furfur at the top of the first tower will prompt a battle against her. This is easily the hardest fight for two reasons. Her bite isn’t just devastating, it also heals her and you actually need her to debuff herself to take damage. The best way to handle her is to fortify until you see that message and then start your assault.
Amadeus Necropolis – Final Morgue – Bottom
Similar to last two bosses, this one is located where you meet the Oracle. It’s another straightforward boss, though don’t be surprised if you can’t beat it on your first visit.
Dusken Tanis – Refrain – N. District
Here you fight the last main story boss and actually unlock the true end path. This fight is different, since it isn’t hard, though it does a lot of burst damage. If you find yourself having issues, the Great Sage’s Pact has a unique donum called Evil’s Bane Blue Stone, which weakens this boss. This pact is located in a chest located behind the goat boss in Cobalt Campanula. After defeating it your fun has just begun.
Getting to the True End Boss
Before you can defeat the boss, you need to complete a new dungeon that is comprised of a level based off every other dungeon, plus a brand new one. Every level designed after a stage retains the same qualities of the actual dungeon, meaning you need to utilize the same tactics. To make this a little easier, you can find my maps below.

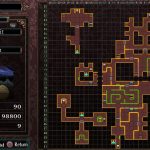
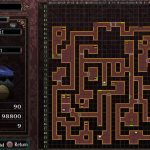


While they’re not fully complete, they do show the path to the end. For Azu-Melm and Azu-Amadeus I strongly suggest using Fog Veil to avoid annoying enemies and not take damage for stepping on red squares. You should also note that there is a boss on Azu-Melm, Azu-Campanula, Azu-Phenom, Azu-Magia and Azu-Tanis. The first two are introduction bosses, with the Azu-Phenom being fairly difficult, Azu-Magia offering no challenge and Azu-Tanis is another glass cannon situation.
Once all the bosses are dead, head to Azu-Astrom and find the north exit. It should require you to go to the X15, Y8 pond and then jump to the end.
Velkuvrana’s Heart
At this point you’re at the last boss and while it seems simple, it’s easily the hardest thing to deal with in the game. The issue isn’t just the obscenely high health, it has some fearsome AoE attacks and has a debuff move straight out of Criminal Girls (it has the chance to hit you with every negative status). Needless to say, this one requires a different build.
The best tactic is to raise your resistance, have plenty of green apples (they bring you back to normal), buff as much as you can and try to inflict status aliments on the heart. If you can do the latter, it’s an extremely easy fight, otherwise you need to learn the pattern (as near as I can tell it has a set rotation) and be lucky.
Since it does so much damage to begin with, I strongly suggest always being on the offense, with there always being someone doing buffs and/or healing. Once multiple allies go down, use items to revive and then heal. Do not let your buffs lapse or you will be in a tough spot.
Other than that, if the boss is too much, simply level and enhance until it becomes a more doable challenge. Outside of that, enjoy your platinum/ending.